Whether it’s remote management, configuration, or monitoring of your networking solutions, the complexity of any of these tasks can increase rapidly. Not to mention the rise in human errors when network management must be done across tens or even hundreds of networking devices.
Keeping your network in top shape shouldn’t be daunting and nerve-wracking, so Teltonika took time and care to craft a visually-appealing surprise for your network management routines with our Remote Management System (RMS). Feast your eyes on the Network Map tool!
VISUALLY PLEASING & FUNCTIONAL? ABSOLUTELY!
When developing this tool, our team prioritised two goals: clarity and ease of configuration. Network Map is more than just a network topology that displays what’s connected in your network; it’s also a user-friendly tool for visual network configuration.
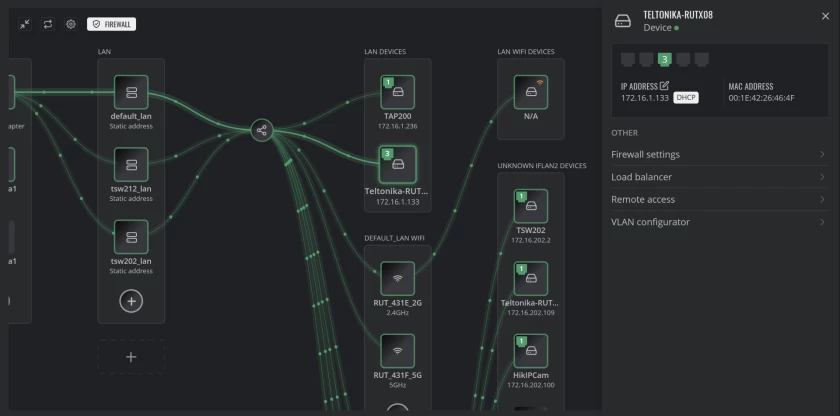
Visual network management has much to offer, especially in terms of efficiency and accuracy. By displaying your entire network infrastructure in one place, organised in a hierarchical and structural order, it becomes much easier to understand the network’s connections, organisation, and operation.
Providing a granular and clear overview of the entire setup, this tool facilitates the remote management and configuration of the network. It eliminates the necessity to adjust each device individually, enabling you to perform a multitude of functions with just a few clicks, thereby saving time and enhancing productivity.
LAN & WAN CONFIGURATION? THE MOST CONVENIENT ONE!
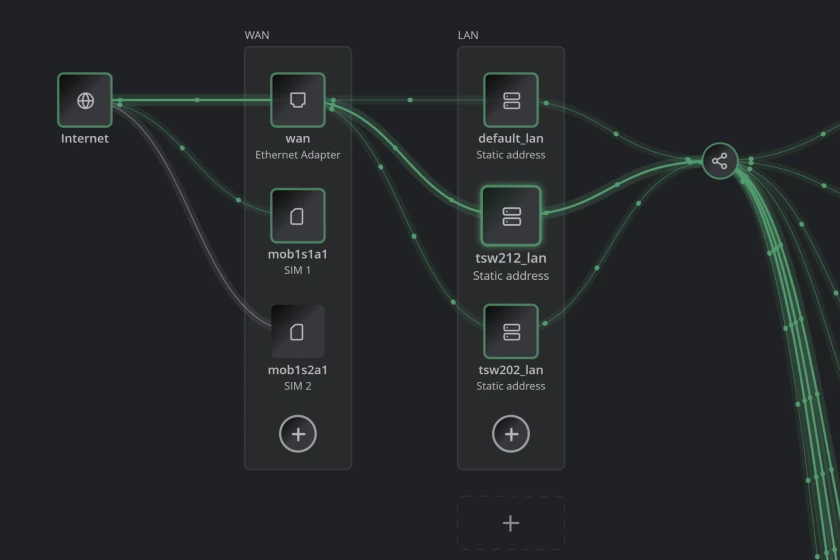
When using the RMS Network Map tool with Teltonika’s networking devices, you get to see more than just a symbolic black box representing your Internet source. Indeed, this tool provides a comprehensive view of both WAN and LAN networks as an integrated communication system.
It displays the network paths within the router, making it easier to understand your network infrastructure and, thus, perform WAN and LAN configuration.
This network management tool lets you set up new LAN or WAN interfaces from scratch. Alternatively, if you prefer not to configure them each time, you can copy and paste an existing configuration and apply it to new interfaces.
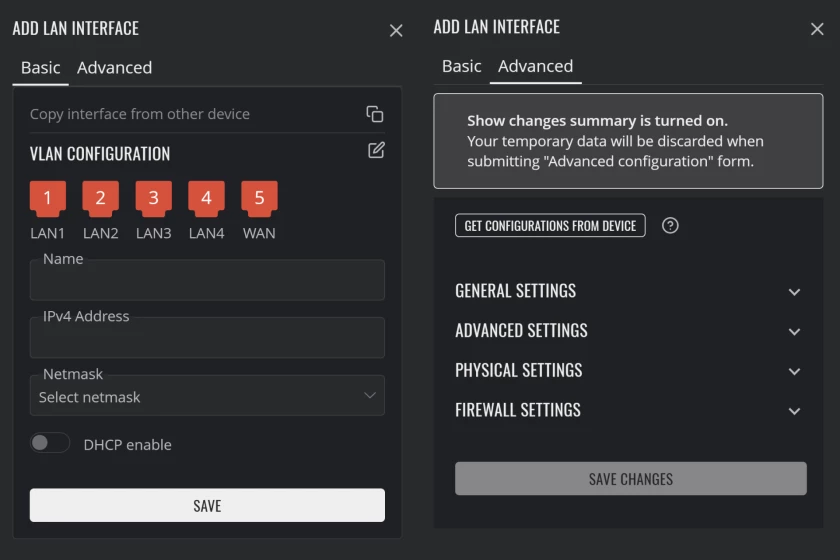
Another great thing about LAN and WAN configuration is the two modes you can work in: basic and advanced. In the basic mode, you can define the interface name, IPv4 address, set the netmask, enable DHCP, and manage VLAN configurations.
The advanced mode, on the other hand, allows for more granular control and provides options for IPv6 management, MAC address modifications, and interface assignments.
Once the new LAN interface is operational, your network configuration can be enriched with load balancer settings, which involves determining the distribution of WAN traffic via this LAN. You can also specify the connection methods within the LAN.
When you click on a product, its path from LAN to WAN is immediately highlighted in a brighter colour. This feature is particularly helpful when network management concerns multiple connections and their remote monitoring, as it helps ensure that specific end devices use their designated Internet sources.
Additionally, you can see which physical port of the networking device is used to connect it to the network. That’s the level of detail we love to see!
WI-FI CUSTOMISATION? THE GREATEST YOU CAN GET!
For those with Wi-Fi connections, this tool is a true gem. It provides a comprehensive level of wireless network management that addresses all the essential aspects of Wi-Fi connectivity.
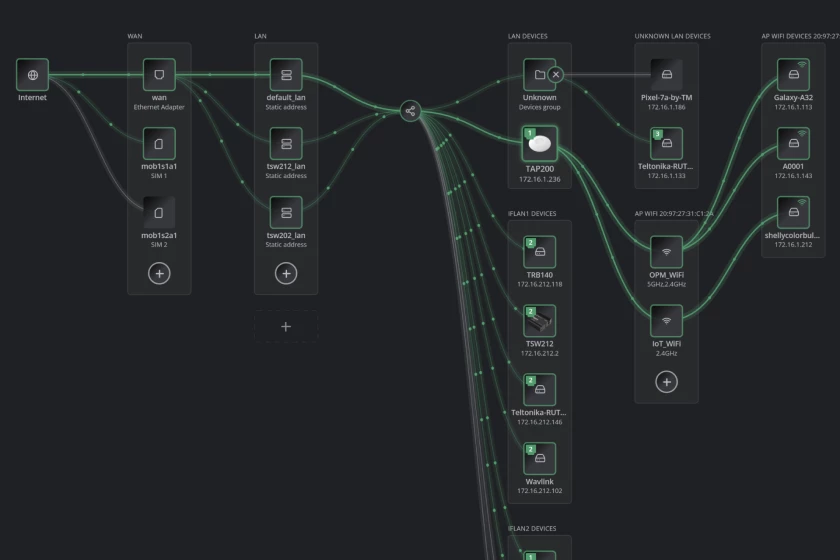
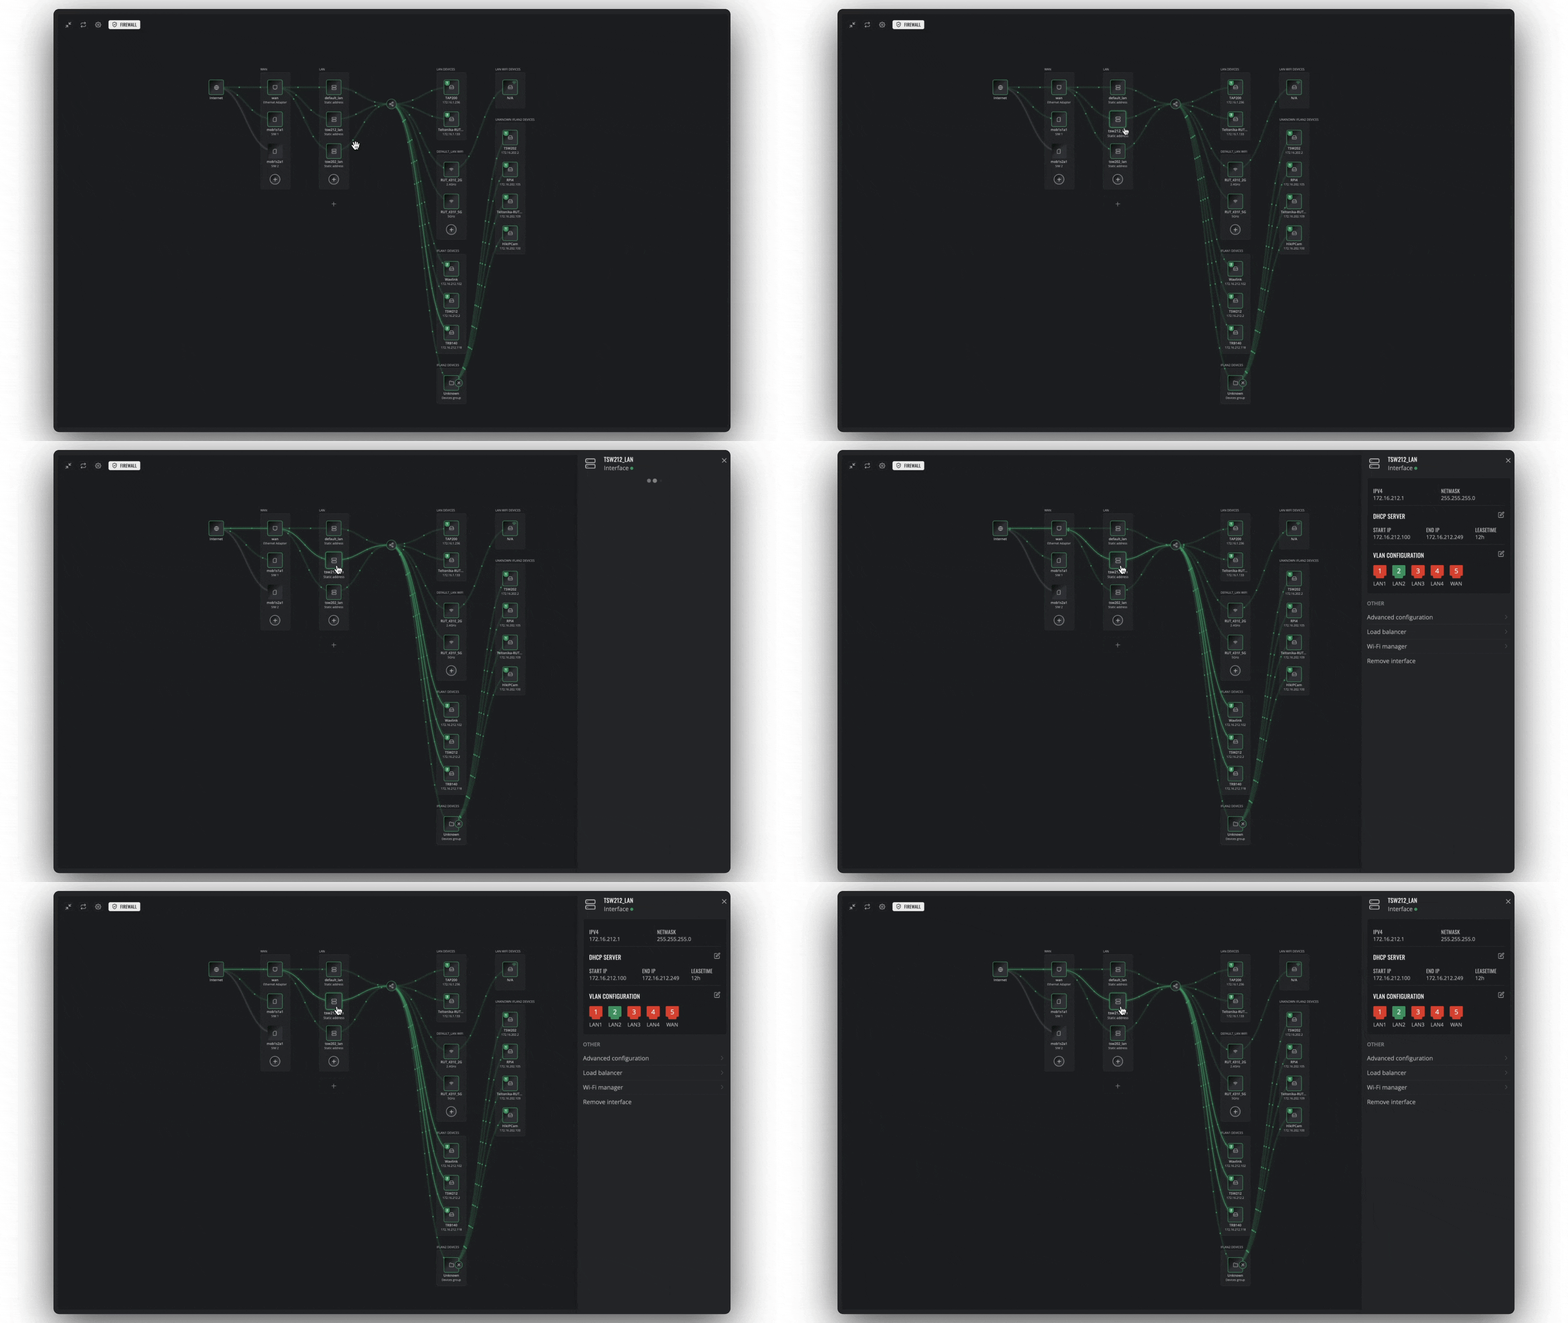
If your device supports Wi-Fi, you’ll find a dedicated Wi-Fi manager section under the selected LAN interface. As you might’ve guessed, Wi-Fi configuration starts right there.
This section lists all Wi-Fi access points configured on the selected device. By selecting any of the access points, you can see all its details, including the Wi-Fi band it uses, its operational status, and the number of connected clients. It also provides information about the LAN network to which the access point belongs, whether or not the ESSID is hidden, and if clients are isolated from each other.
When setting up Wi-Fi access points, there’s an option for you to select specific devices. This feature lets you activate multiple access points simultaneously, simplifying the entire network configuration process. Similarly, if you need to deactivate or remove these access points, you can do so collectively, without having to delete each individually.
Of course, this network management tool offers all the necessary details to access the Wi-Fi network. You can even generate a QR code for quick and easy login.
Just like with LAN network configuration, you can copy Wi-Fi access point settings and apply them to other access points, simplifying the process and eliminating the need to repeatedly configure each access point individually. Wi-Fi access points also offer an advanced mode, allowing you to apply configurations that would typically be done through the device’s operating system.
OTHER PERKS? OF COURSE!
At this point, it’s evident that Networks Map greatly enhances your interaction with network infrastructure. But it’s capable of much more!
To simplify your workflow, Teltonika incorporated RMS Connect – a tool for engineers and IT administrators to remotely manage and control their IoT device networks. So, whether you’re establishing or have already set up remote access for a device through RMS Connect, Network Map will instantly display all relevant information and grant complete control over its functionalities.
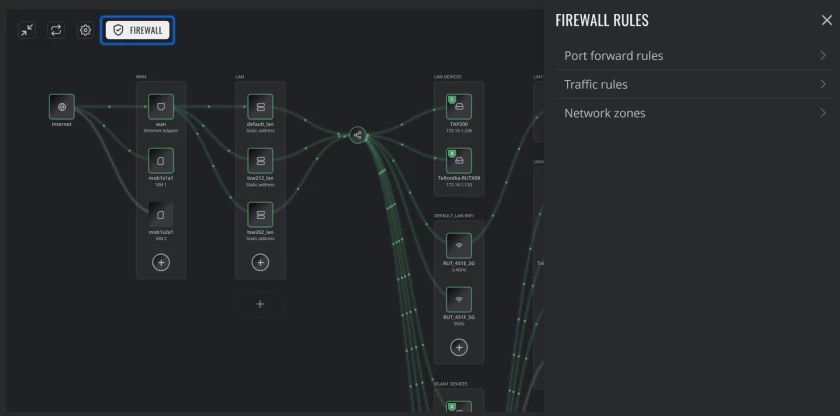
This Network Map tool allows you to set the IP addresses of devices in your network yourself while configuring them via Static DHCP lease instead of inside the device.
Moreover, you can perform firewall configurations here, like setting up port forwarding rules. The firewall configuration tool offers both basic and advanced modes, with the basic mode primarily focusing on automated configurations.
Each time you change your network infrastructure’s setup, you can click on the preview button before submitting. Doing so will allow you to see all pending changes, which is an extra step to prevent any unintentional configurations.
CUSTOMISABILITY? WOULDN’T HAVE IT ANY OTHER WAY!
The layout of this network management tool isn’t set in stone, and you can definitely customise it to meet your preferences. This is exactly what the Settings button at the top left corner is for.
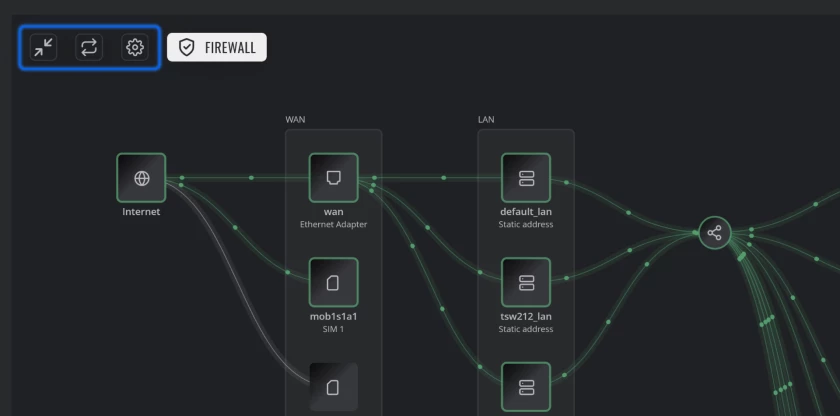
By clicking on it, you can specify which connections or groups of devices you’d like to see, whether you want a summary of changes made to the configuration, and if you’d like to cache data for faster topology uploads.
There’s also a Refresh Data button to update the displayed network topology and a Toggle Fullscreen button to expand or narrow the display of the Network Map tool.
HOW PRECISE IS IT? DOWN TO THE LAST DETAIL!
If your IoT solution consists of Teltonika’s networking devices, RMS Network Map will provide you with the most comprehensive information about your entire network infrastructure. You’ll be able to see which devices are connected to each other, and even identify the physical ports used to connect these devices.
However, one of the best parts of using this tool with Teltonika networking devices is that whenever you apply network configuration changes using this tool, RMS will automatically configure all devices directly affected by the changes you made to the network path, so you won’t have to.
You see, this feature isn’t just here to help – it’s here to make your network management routines ten times faster and simpler.


